Showing posts with label before and after. Show all posts

Thursday, May 5, 2011

Garden Caddy?


Is is a caddy?

Yesterday was Wonderful Wednesday!  I had a pretty good haul, too, for the $25 I shelled out.  I got:
A wire frame wicker storage basket, a clay planter, a tiny clear glass vase, a dress and nightgown for Li’l T; a nightgown and jammies for N; new sandals, 5 pairs of shorts, 4 tee shirts, and a bathing suit for Jon; a pair of Tommy shorts for D; three cedar deck chairs; 

You can rest assured that THESE are gonna get a little special treatment soon!


and this thing.

I don’t really know what it is, or what it’s intended for; look at that weird angle on the bracket thingie.  


Strange, no?  Several of us looked it over at the store, just being goofy about what to do with it, and the more I looked, the more potential I could see.  Besides, it was only 45 cents :).
Since I’ve been so focused on the garden and flower beds, I could use it to shlep new plants back and forth from bed to bed.  Or to carry the tools, gloves, plant foods, etc. that I might need.  OR I could use it for tools, paint, sandpaper, yada yada, when I’m working inside.  Either way, it’s going to earn its keep, once I make it pretty.
I am really hung up on my brights right now...  there was no other option but yellow for this piece.  Krylon “Bright Idea” is finding its way into and onto a bunch of stuff lately - I first picked it up to make this little darlin’ stand out a bit more.


If it ever stops sprinkling (C’MON ALREADY!!!), I will get my little friend done, but in the meantime,  my carrier is looking better by the minute.  
It was pretty grody at first.  


Even after wiping it down pretty thoroughly, I can’t imagine that paint would’ve adhered, and I’d have had peeling fairly close to immediately.  TSP to the rescue! 

After disassembling the creature, I sprayed both of the wooden parts down and let them sit for about 5 minutes.  I could see and feel the difference as I wiped them off, and within another 5 minutes, I was ready to prime.  One frustrating coat of primer (windy much?), one dowel dropped in the dirt (grrrr...), and about 5 coats of the yellow got me this far.


Yes, I know that the middle of the tray isn’t painted.  That’s ok, see, ‘cause I’m tiling the bottom of the  tray with these.


I went to Home Depot to look for these, which I’ve been reading about on other blogs...


...but our store doesn’t carry them.  While I was looking, though, I found these.


Super cheap!  $3.20 per sheet, instead of the $10 for a sheet of the SmartTile.  They’re lightweight, which was crucial, and I happen to have thinset and grout left from other projects, so this was a no brainer.  Plus, look at that purdy iridescence!  Two sheets make the perfect length, but they’re two rows too wide.  Easy fix, just slice through the mesh backing and I’ve got some fun little rows of tiles leftover for another project.
Once the paint was all dry, I could break out this fun stuff.


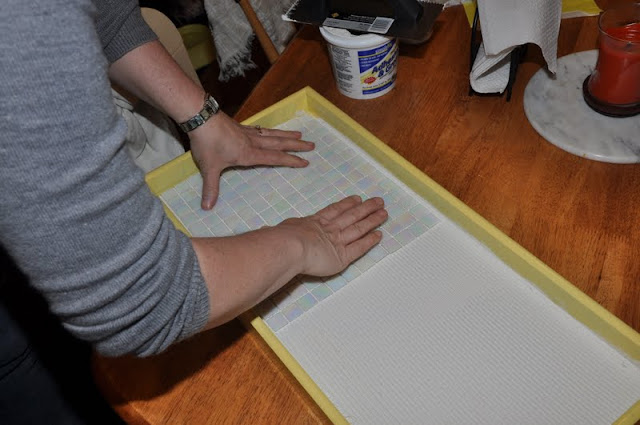
What a concept - it acts as both adhesive (thinset) and grout.  Since the tile I got is so lightweight, I used the superfine edged trowel (it looks like a pinking shear cut its edge).  I applied an even coat of the adhesive, 


and just placed the sheets of tile as centrally as possible. 


There is a thin area around the edge of the tile that will have to be filled with grout, but it was not worth the effort to try to cut tile to fill such a narrow space.
Here she is... all done except for the grout, which can’t be scrubbed in until the original layer has cured for 24-36 hours, and I couldn’t wait that long to show her off!


I’m pretty pleased with the result, and the investment was so minimal!  $.45 for the caddy, $6.40 for the tiles, and the paint and grout I already had from other projects.  Less than seven bucks, and I bet I’ll use it for a long, long time.

What do you think?  I'm considering painting out the "handle" area with a glossy white enamel, to make it look like ceramic and to help it wear better.  Which way would you go?  Handle or no?

Anyway, tomorrow is Friday... and I am so ready!  Have a great day and I'll be back tomorrow with another so simple/looks so complicated recipe.

Friday, April 1, 2011

Shabby Kids' Cabinet (Under $5!)


Under $5 Makeover!


On Wednesday, my Mom watched the kids for hours, so I could hit the Thrift and take care of whatever else I wanted  to do sans children.  I have to admit, it took me a while to come up with things to do, simply because I NEVER have that much time all by my lonesome!  
At the Thrift, I found a couple of really cheap things that have excellent makeover potential.  
Tiny, cheap, impractical...  and $2.49!

This baby rocks!  No, really, it's a rocking chair.  $2.49! ~ I never understand how they price things  :)


D is from New York...  but I'm still gonna re-canvas this for him.  Father's Day, y'know.

I also got a couple of organizational things (still loving the covered wire separators!) and a bunch of clothes for the fam.  Total there... $33.  Maybe a bit more than I’d have liked, but I came home with tons of necessary items as well as the crafty inspiration pieces. 
Next I stopped at the library, renewed my best friend library card , and then I hit St. Vinnie’s.  It was packed with furniture goodness, but my cargo area was filling up too quickly, so I was judicious and for once passed some things by.  Yes, Honey, it does happen!  I couldn’t pass this by, however.  
OMG, the glare!  My eyes, my eyes...
I’m sure you’ve seen those all over blogland, but I have been living with this...


Icky, icky, ICK!

for 7 years, and it’s time. for. it. to. go.  I have started coming around to milk glass for decorative glassware, and I even enjoy it sometimes as a display piece, usually with pastry, but I hate, hate, HATE it as a lighting fixture.  Seriously. hate. it.  And they were all over this house!   This is the last one, and it’s in the very neglected front “entry” of the house, which has enough makeover potential to get it’s own post.  I’ve got plans, folks!  Hopefully it will happen soon...
Anyway, the lamp.  Only $3, and I’ve got all kinds of paint, so now I have to decide whether to bronze it, or give it a shabby ivory finish.  Only thing I'm sure about it is that it's NOT staying brass!  Coupla days, we’ll have a post devoted to that.  I also have to decide about the starburst thingies on the glass.  Maybe the glass will stay, maybe not.  I’m all for taking suggestions - comment away!
After I visited Vinnie, I knew I needed to head to the dreaded Mall area.  On my side of town there is not a single craft or fabric store; they’re all bunched up by the Fox River Mall, where the traffic (for a city this size, anyway) is really crappy.  People drive like idiots, and there’s ever anyplace to park.  I tend to bunch together my errands for this area, and try to kill all them birds with one trip.  Oh yeah, my grammar is deteriorating daily!  AND I’m destroying metaphors!  I’m giving myself the creeps.
Off to the West side I went, and was just planning an attack on the crafties when I realized I had all the time in the world (well, a couple of hours), and I hadn’t donated blood in, like, forever.  One dangerous quick lane change later, I was there, getting drained and happily anticipating the coffee and dee-lish-uss peanut butter cookies that they serve to ease you out the door.  I also got this!
Yes, it does say  SEVEN gallons!  I wish I knew my real number of donations.  It’s hard to keep track when you move from one region of the state to another, so you might have to start over.  I had to twice, I think, but there weren't too many pints lost.  Still, though, 56 pints!  I’m pretty proud, especially considering the years that I couldn’t donate at all because of pregnancy (four kids, but 7 pregnancies total).  As always, PLEASE DONATE BLOOD!
The rest of the afternoon went by in a blur...  Hobby Lobby, Michael’s Crafts, TJ Maxx, and finally WallyWorld to stock up on groceries for the rest of the week.  Home by 3:00, totally exhausted.  Probably that was exagerated a little bit by the fact that I skipped breakfast and lunch, and gave blood.  What?  I ate when I got home - it’s fine :)

Tired or not, though, I had to get to work on this.  It’s such a simple little piece, but I could picture it all finished the second I laid eyes on it, so as soon as I’d eaten, I was taking this baby apart and makin’ her pretty.

I don’t know what she’s made of, but she weighs about 2 ounces.  Seriously, I’m gonna have to anchor her to the wall, or an errant door slam could knock her over.  She had very accessible screw fasteners, so she probably came unassembled originally- made my job super easy.  What was not as easy was getting her to take paint.  I roughed up the pieces with some fine sandpaper, and set about priming, but she wasn’t much in the mood.

Two coats of primer, done in shifts to get all the sides, and I was ready to try the paint.  I used Krylon semi-gloss white, mostly because that’s what I had on hand.  I go back and forth between Krylon and Rustoleum;  I find them pretty interchangeable.  I think there are 5 thin coats on right now - I will need to sand the top and add at least another 2, plus some polycrylic, but I don’t have that on hand and I didn’t want to wait to show this!
When the back panels had had their exteriors painted, I was ready to apply the shelf liner to their insides.  


I’m using this paper for another project for Li’l T’s room, and I love it.  I got it from Michael’s, back in the dollar section (although it was $3) and it’s lasting me forever.  Really sticky, and cutting guidelines that save a careless cutter like myself.
* That other project should come together pretty soon, too, if the temp will just stay above 40 so I can get more painting done!


Putting her back together went pretty smoothly, too, except for one warped side of the front case.  I didn’t notice it assembled, I didn’t notice it in pieces, but I surely noticed it when I was trying to line up those screw holes!  A couple of mumbled curse words later, there she was!  I’m pretty pleased, and so is the Tashster, although she doesn’t look it in this pic. 

Please disregard the piles & mounds of junk in the background...

She wanted to know why she had to pose when she was ready to have a tea party!

Here it is up in her room, staged as it won't be ever again!  One of these days I'll get her whole room looking good on the same day, and you'll have a chance to look it over.


So, I told you this was cheap, and I wasn't kidding.  $2.49 for the cabinet, $2 for the pretty pink knob, from the Hobby Lob, and primer and paint that I had on hand.   Cha-eep!  And beautiful, if I do say so myself.  One more look, ok?


Wordy today, huh?  Hope y'all have a great weekend!  I'll be back atcha as soon as I can put together some more goodies for you!   'Til then...


xoxo,
Tami


linking to: