Friday, May 20, 2011

Parenting issues

It’s a beautiful day outside.  The sun is shining, there’s a gentle breeze, the humidity is under control... and the kids are out there screaming, fighting and just generally trying to cripple each other’s self-esteem.  Soooo glad it was only a half day of school!  (Sarcasm is ugly.)  
Truth be told, they have been owley since the moment their beautiful blue eyes opened this morning.  Previously very excited to participate in “Bike to School Day”, the older two kids wouldn’t eat, get dressed, or clean themselves up this morning, except in slow motion.  They fought me at every turn, and finally, I ended up driving them to school, and we were still almost late.  Seeing all the other families biking in together made me actually cry as I dropped them off.  I have no control over this family!  The puppy, too.  She decided that 20 minutes alone in the car was offensive enough  that she should punish me by destroying the cables for our portable DVD player.  Since I’m driving cross-country in two weeks, this is just about all I can handle.  It adds up to a pounding headache and a very poor attitude on  my part.  This is a huge shame, since I had planned to take them all on a picnic when I picked them up.  No more of that.  Rewarding bad behavior is just dumb, but...
Whoever dreamed up the idea that taking away privileges was a great deterrent for bad behavior was dreaming.  I’ve tried taking away actual things, then privileges, and tacked on chores as “punishment”.  None of these worked, and unfortunately, I don’t have a better idea.  I am feeling very inadequate, and wondering how I am ever going to manage a week-long trip in June, with 3 kids and a dog in the car.  I think I may be having to re-think that.
Sorry to be such a Debby Downer today.  I’m feeling kind of at my wit’s end.  If anyone has some words of advice and/or inspiration, I’d be glad to hear them.  
Next time will be much brighter, I promise!  
xoxo,
Tami

Monday, May 16, 2011

A funny for you, and a plea for me...

I just had a visit from my favorite brother's wife, who I haven't seen for almost a whole year!  Way too long, but it was sure nice to have a couple of hours to spend with her as she travels down to Tennessee to help her folks (snowbirds) prepare to make the trip back for the summer here in Wisconsin.
While she was here, she had to share with me the hysterical video I've attached below, and so now I am passing it on to you.  Goofy fun!


Hope that made you laugh...  it sure did me good to just giggle like a kid over it!
If you liked it, please feel free to spread the love!  It always makes me feel good to think I've brightened someone's day  :)
And if you like me, or just reading my nonsense, feel free to "Like" me on Facebook. Share the love, people!  Also, I'm always trying to figure out what y'all wanna read about, so don't be shy with comments, either good OR bad.  And finally, if you read me regularly, please consider becoming a Follower.  It's really only important to me, but I get a big rush whenever a new person comes on board!  Selfish much?  Yep, it's all about me!  ;)


Have a great night, everyone!
xoxo,
Tami

Progress and some sweet challenges

Losin' it
I promised you an update on my weight loss today, so here I am.  First, let me explain that I’m not doing anything with a plan, because I really kinda suck at that.  :)  
Well, I did follow South Beach after I had Li’l T, and I lost a TON, but that was in combination with breastfeeding.  It’s hard to say whether it would’ve been as successful with my normal metabolism.  Also, I had to stay in Stage 1 pretty much forever, because any carbs just sent me into a tailspin.  Unfortunately, I gained back what I had lost over the past 4 years, and so I had to start over.
And I did... one week ago.  First I looked at various websites, because I’m just not the “joiner” type.  I can’t imagine going to meetings, or talking to a coach.  I know myself well enough to understand that I wouldn’t follow through, so I skipped that whole avenue.

What I DID do, was find an online Calorie Calculator, which is really a basic tool to figure out how many calories you should consume each day to meet you weight loss goal.  I’m embarrassed to say I can’t find the exact page I used for this, but there are so many that you’ll be able to find one you like.  As I searched today, I punched in the exact numbers in to at least 5 different sites, and ALL of them are giving me a higher number of calories a day to keep losing (around 1500).  I hope to lose about 2 pounds a week, realistically.  My original site gave me 1265.  Per day.  Ouch!  But I did it!  And...
Not me... but that IS 5 lbs of fat in her belt.  NASTY!
That was 5 pounds ago!  Yep, I’m down a little over 5 pounds already, which is enough to inspire me to keep going, although I’m setting my calorie goal a bit higher for the coming week (maybe 1350?).  I use a really simple free program from Google


that resets daily, and I can add my own items when I need to.  It’s a way to keep myself honest, without joining anything.  Ha!
Now, about my challenges this week.  There was a Spring Carnival at the kids’ school on Friday.  And, way before I hit rock bottom regarding the size of my arse, I volunteered to bake some things for the Cake Walk.  I love to bake!  I love sweets!  What could go wrong?  Well, baking and not being able to lick the beaters.  Or “taste test” the scrumptious buttercream or (OMG!) Peanut Butter Frosting.  It was tough.  REALLY tough.  But I made it through.  AND I’m going to share some recipes with you, because life without treats is just wrong.  Right?

Just a few to choose from...  :)
This cake recipe was passed down to me through my Mom.  I just found out it was originally called WWII Cake, because the mayo was a substitution for eggs and oil that were so closely rationed that cake had become a precious commodity.  We just call it Mayonnaise Cake, which sounds so wrong, but tastes so right!
Mayonnaise Cake

2 cups flour
1 cup sugar
2 teaspoons baking soda
1/2 cup cocoa powder
1 cup Miracle Whip light
1 cup cold water
1/2 teaspoon vanilla extract 
Add all ingredients as listed. Beat until well mixed. Bake in greased 9x13 pan for 30 minutes at 350 degrees, or until cake pulls away from sides of pan.  Do not overbake.   
For layer cakes, multiply ingredients by 1.5.  You can also substitute coffee for the water for an even deeper flavor.  Coffee right IN the cake... AWESOME!
I have always loved this cake with a simple buttercream frosting, or simple whipped cream on a slice of cake still warm.  Chocolate frosting seems to detract from my enjoyment of the richness of the cake.  Just my opinion!
I wanted to do something awesome for the Cake Walk, though, so I made Peanut butter frosting.  I’ve never made it before, and that’s probably a good thing, or I’d be totally obese.  OMG, it is so good!  If Reese’s peanut butter cups are a weakness of yours, this frosting, on THAT cake, is gonna rock your world.
Peanut Butter Frosting
1/2 cup real butter
1 cup creamy Jif peanut butter
3 cups confectioners' sugar
milk as needed

In a large bowl, beat butter and peanut butter until light and fluffy. Slowly beat in 1/2 of the confectioner's sugar. Use milk to bring the mixture back to creamy. Beat in the remaining confectioners' sugar. If necessary, add a little more milk until the frosting reaches a good spreading consistency. Makes enough to frost one 2 layer 9 inch cake or one 9x13 inch cake.
I modified this recipe from one by Suzanne Stull at allrecipes.com.

Garnish with Reese's Pieces, and...


beautiful!


Try them, and let me know what you think.  Separately OR together, these are life-changingly yummy.  (OK, not really.  But they are bee-lish-us!)

Tomorrow, or maybe the next day, I'll give you recipes for the reverse... peanut butter cake with a deep chocolate frosting.  See why I'm struggling???  :}


xoxo,


Tami

Sunday, May 15, 2011

Popover Goodness

Popovers                                                                    May 15, 2011

Have you had them?  Have you ever made them?  They look like such a gourmet treat, and they can be filled with so many types of goodness that they can be totally fancied up or simply enjoyed hot out of the oven with butter.
Just like the Cream Puffs that I wrote about for Mother’s Day, Popovers are one of those easy-peasy recipes that just look difficult.  They’re made with 4 simple everyone-has-them ingredients, and can be made in muffin tins

Gordmans is great for bakeware... this was only $4.99.
or custard cups, as well as the special popover pan that I’m gonna use today (Thanks, D!).


Here are your ingredients...

Yep.   2 eggs, one cup of milk, one cup of flour, and a teaspoon of salt (any salt will work, I just prefer the popcorn salt myself).
Preheat the oven to 450 degrees.  Beat the eggs, but not too much; stir in the milk; stir in the flour and salt;  you’ll get a lumpy, gloppy looking mix.  Strangely, that’s just what you’re looking for.

Grease your pan of choice (today I used Baker’s Joy),
Baker's Joy

and fill the cups half full.  


Bake at 450 for 20 minutes, then reduce heat to 350 and bake for 20 more.  When the timer goes off, you’ll want to be ready, because they are amazing just out of the oven!

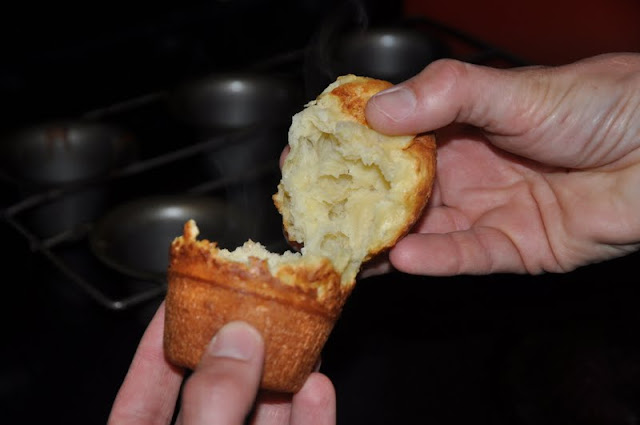
Break one in half, and watch the steam waft out...

Wafting steam is very difficult to capture on camera!  :(
Dab on some butter, and watch it melt down the sides... and then eat it!  
Popovers are versatile creatures.  Besides being a great bread before dinner, they can be dessert (add a few drops of vanilla to the batter and then sprinkle some sugar and cinnamon over the buttered insides when serving), or even the entree (fill with asparagus in cream sauce... mmmm).  My kids all like hard boiled eggs in a white sauce, 
Creamed Eggs

and that makes a fancy looking brekkie when you serve it with popovers.  
We usually use toast points.  Hey, not every morning has time for the fancy!

Now, you may recall that I am on a diet, and I said there would be no popovers in my house.  Well, the very best thing about this delicious treat is that each one is a puny 68 calories!  Even if you eat a whole pat of butter (36 cals) on each one, that is only a hair over 100 calories apiece!  I've found that about half a pat is sufficient for me, since these are so tasty all by themselves.

The diet is going well, and I will tell you more about that tomorrow.  Today, make yourself a little treat, and enjoy!  

xoxo,
Tami 


Tuesday, May 10, 2011

Planting pretties on a rainy day

May 10, 2011

Spring has definitely finally sprung... along with the thunderstorms that shake things up, and the random showers that seem to be falling constantly.  On the plus side, of course, is the fact that it’s not snow. :)  My flower beds are looking pretty good for the limited amount of decent weather that’s been available, 

but when I’m stuck inside, I still have that itch to have my fingers in the dirt.  My solution this past week has been to create some pretties inside - like these ivy topiaries.
I started with a pair of these bronzy pots from Goodwill - $1.50 apiece.

Then this week I found these little topiary frames, also at GW, and they were just what I’d been hoping for (and only $1.49 each).  
Seriously, GW’s garden stuff finds its way to my house on a pretty regular basis.  Who knew?
Finally, all I needed was the perfect plant to pot up... I love ivy, but certain varieties are prettier than others, can we agree?  For a topiary, I prefer the smallest leaves possible, and since I couldn’t find any angel vine, 
Angel Vine Trellis
I settled for a pair of these, which I found at Home Depot.  They are labeled as “Royal Hustler”, but that doesn’t agree with online resources, so your guess is as good as mine.  Sorry!

These were $4.59 each.
The rest is simple, of course.  Repot the ivy in the display pot, or just drop the store container in, if it fits well.  Be cautious about the placement of the prongs that anchor the topiary - separate the leaves and branches and look for a place where the roots look slightly less dense.  Then just slide the prongs in, being sensitive to areas of real resistance.  If you hit a big blockage, it’s better to reposition the prongs than to risk doing serious damage to the root system.
Once your frame is in place, start winding the longest branches around.  Sometimes I opt to strip the leaves off of the branch where it wraps the center pole; this time, since the branches are so short, I left them intact for some fullness.  Once I’d wrapped every piece that would reach, I had some leftovers that were either just too short or, in one case, just too densely leaved to wind at all.  
Too dense

Itty bitty, but not for long!

Those pieces I chose to save to root... ivy roots incredible well, both in water and in a soil medium.  I have lots of seed starting soil left over from my veggie seedlings, so I just filled a sour cream container with soil, wet it down, and went to work.  I have had really good results with Schultz "Take Root" hormones- I use it for propagating as well as for trying to rescue damaged branches from various plants.  
(Rescue work has about a 50/50 success rate, but that’s still better than just having a plant funeral every time!)
Rooting ivy with a hormone medium really couldn’t be simpler.  Wet the cut end, swish it through the hormone powder, 
You really shouldn't work with the hormones without gloves.

and plug it into the moist soil.  Done.  Keep the soil moist (NOT wet), and in a couple of weeks, you can gently tug the starts right out of the soil and transplant them wherever you like.  This one container will start about 10 plants. 

If you make enough of them, you can easily give them away to friends, or donate them to a school fundraiser.  I’ve used a Walmart sale hanging ivy and made 30-40 starts from it, while still having an attractive center plant remain.  It’s a productive way to spend those rainy days!

Wishing you all sunshine!

xoxo,
Tami

Thursday, May 5, 2011

Garden Caddy?


Is is a caddy?

Yesterday was Wonderful Wednesday!  I had a pretty good haul, too, for the $25 I shelled out.  I got:
A wire frame wicker storage basket, a clay planter, a tiny clear glass vase, a dress and nightgown for Li’l T; a nightgown and jammies for N; new sandals, 5 pairs of shorts, 4 tee shirts, and a bathing suit for Jon; a pair of Tommy shorts for D; three cedar deck chairs; 

You can rest assured that THESE are gonna get a little special treatment soon!


and this thing.

I don’t really know what it is, or what it’s intended for; look at that weird angle on the bracket thingie.  


Strange, no?  Several of us looked it over at the store, just being goofy about what to do with it, and the more I looked, the more potential I could see.  Besides, it was only 45 cents :).
Since I’ve been so focused on the garden and flower beds, I could use it to shlep new plants back and forth from bed to bed.  Or to carry the tools, gloves, plant foods, etc. that I might need.  OR I could use it for tools, paint, sandpaper, yada yada, when I’m working inside.  Either way, it’s going to earn its keep, once I make it pretty.
I am really hung up on my brights right now...  there was no other option but yellow for this piece.  Krylon “Bright Idea” is finding its way into and onto a bunch of stuff lately - I first picked it up to make this little darlin’ stand out a bit more.


If it ever stops sprinkling (C’MON ALREADY!!!), I will get my little friend done, but in the meantime,  my carrier is looking better by the minute.  
It was pretty grody at first.  


Even after wiping it down pretty thoroughly, I can’t imagine that paint would’ve adhered, and I’d have had peeling fairly close to immediately.  TSP to the rescue! 

After disassembling the creature, I sprayed both of the wooden parts down and let them sit for about 5 minutes.  I could see and feel the difference as I wiped them off, and within another 5 minutes, I was ready to prime.  One frustrating coat of primer (windy much?), one dowel dropped in the dirt (grrrr...), and about 5 coats of the yellow got me this far.


Yes, I know that the middle of the tray isn’t painted.  That’s ok, see, ‘cause I’m tiling the bottom of the  tray with these.


I went to Home Depot to look for these, which I’ve been reading about on other blogs...


...but our store doesn’t carry them.  While I was looking, though, I found these.


Super cheap!  $3.20 per sheet, instead of the $10 for a sheet of the SmartTile.  They’re lightweight, which was crucial, and I happen to have thinset and grout left from other projects, so this was a no brainer.  Plus, look at that purdy iridescence!  Two sheets make the perfect length, but they’re two rows too wide.  Easy fix, just slice through the mesh backing and I’ve got some fun little rows of tiles leftover for another project.
Once the paint was all dry, I could break out this fun stuff.


What a concept - it acts as both adhesive (thinset) and grout.  Since the tile I got is so lightweight, I used the superfine edged trowel (it looks like a pinking shear cut its edge).  I applied an even coat of the adhesive, 


and just placed the sheets of tile as centrally as possible. 


There is a thin area around the edge of the tile that will have to be filled with grout, but it was not worth the effort to try to cut tile to fill such a narrow space.
Here she is... all done except for the grout, which can’t be scrubbed in until the original layer has cured for 24-36 hours, and I couldn’t wait that long to show her off!


I’m pretty pleased with the result, and the investment was so minimal!  $.45 for the caddy, $6.40 for the tiles, and the paint and grout I already had from other projects.  Less than seven bucks, and I bet I’ll use it for a long, long time.

What do you think?  I'm considering painting out the "handle" area with a glossy white enamel, to make it look like ceramic and to help it wear better.  Which way would you go?  Handle or no?

Anyway, tomorrow is Friday... and I am so ready!  Have a great day and I'll be back tomorrow with another so simple/looks so complicated recipe.