Thursday, May 5, 2011

Garden Caddy?


Is is a caddy?

Yesterday was Wonderful Wednesday!  I had a pretty good haul, too, for the $25 I shelled out.  I got:
A wire frame wicker storage basket, a clay planter, a tiny clear glass vase, a dress and nightgown for Li’l T; a nightgown and jammies for N; new sandals, 5 pairs of shorts, 4 tee shirts, and a bathing suit for Jon; a pair of Tommy shorts for D; three cedar deck chairs; 

You can rest assured that THESE are gonna get a little special treatment soon!


and this thing.

I don’t really know what it is, or what it’s intended for; look at that weird angle on the bracket thingie.  


Strange, no?  Several of us looked it over at the store, just being goofy about what to do with it, and the more I looked, the more potential I could see.  Besides, it was only 45 cents :).
Since I’ve been so focused on the garden and flower beds, I could use it to shlep new plants back and forth from bed to bed.  Or to carry the tools, gloves, plant foods, etc. that I might need.  OR I could use it for tools, paint, sandpaper, yada yada, when I’m working inside.  Either way, it’s going to earn its keep, once I make it pretty.
I am really hung up on my brights right now...  there was no other option but yellow for this piece.  Krylon “Bright Idea” is finding its way into and onto a bunch of stuff lately - I first picked it up to make this little darlin’ stand out a bit more.


If it ever stops sprinkling (C’MON ALREADY!!!), I will get my little friend done, but in the meantime,  my carrier is looking better by the minute.  
It was pretty grody at first.  


Even after wiping it down pretty thoroughly, I can’t imagine that paint would’ve adhered, and I’d have had peeling fairly close to immediately.  TSP to the rescue! 

After disassembling the creature, I sprayed both of the wooden parts down and let them sit for about 5 minutes.  I could see and feel the difference as I wiped them off, and within another 5 minutes, I was ready to prime.  One frustrating coat of primer (windy much?), one dowel dropped in the dirt (grrrr...), and about 5 coats of the yellow got me this far.


Yes, I know that the middle of the tray isn’t painted.  That’s ok, see, ‘cause I’m tiling the bottom of the  tray with these.


I went to Home Depot to look for these, which I’ve been reading about on other blogs...


...but our store doesn’t carry them.  While I was looking, though, I found these.


Super cheap!  $3.20 per sheet, instead of the $10 for a sheet of the SmartTile.  They’re lightweight, which was crucial, and I happen to have thinset and grout left from other projects, so this was a no brainer.  Plus, look at that purdy iridescence!  Two sheets make the perfect length, but they’re two rows too wide.  Easy fix, just slice through the mesh backing and I’ve got some fun little rows of tiles leftover for another project.
Once the paint was all dry, I could break out this fun stuff.


What a concept - it acts as both adhesive (thinset) and grout.  Since the tile I got is so lightweight, I used the superfine edged trowel (it looks like a pinking shear cut its edge).  I applied an even coat of the adhesive, 


and just placed the sheets of tile as centrally as possible. 


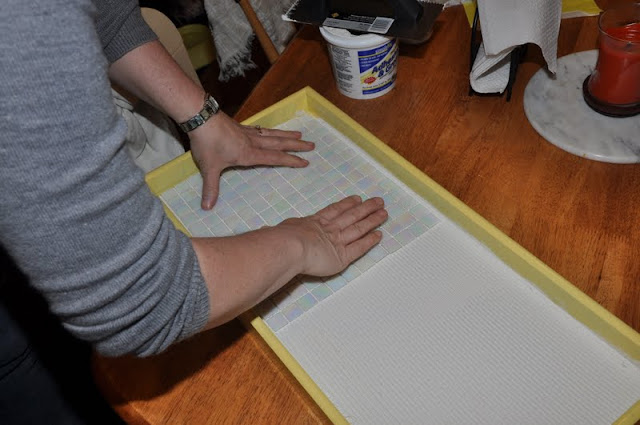
There is a thin area around the edge of the tile that will have to be filled with grout, but it was not worth the effort to try to cut tile to fill such a narrow space.
Here she is... all done except for the grout, which can’t be scrubbed in until the original layer has cured for 24-36 hours, and I couldn’t wait that long to show her off!


I’m pretty pleased with the result, and the investment was so minimal!  $.45 for the caddy, $6.40 for the tiles, and the paint and grout I already had from other projects.  Less than seven bucks, and I bet I’ll use it for a long, long time.

What do you think?  I'm considering painting out the "handle" area with a glossy white enamel, to make it look like ceramic and to help it wear better.  Which way would you go?  Handle or no?

Anyway, tomorrow is Friday... and I am so ready!  Have a great day and I'll be back tomorrow with another so simple/looks so complicated recipe.

Wednesday, May 4, 2011

Cream puffs for Mother's Day!


A treat for Mom on Mother’s Day

Mom came for dinner tonight - nothing special, just burgers & brats.  The sun is finally shining, and the screens are up on the door, so it MUST be time to grill. Granted, D is a year-round griller, but that’s beside the point.
Anyway, I asked Mom what she’d like for dessert, and she requested... cream puffs.
Delightful!  They are so easy, and can be customized in any number of ways, although we tend to stick to the tried and true.  If you like them but have never made them, you’ll love this simple treat!
Simple Cream Puff Shells

1 cup water
1/2 cup butter or margarine
1 cup flour
4 eggs

Preheat oven to 400 degrees.  Heat water and butter to a boil;

stir in flour.  Stir over low heat for 1 minute or until mixture forms a ball.  Remove from heat and stir in eggs one at a time until mixture is smooth.  Spray cookie sheet with baking spray, and drop large tablespoons of mixture onto sheet.  


Bake for 35-37 minutes.  This batch makes 12-15 puffs.

Cool for about 30 minutes, then cut off top third of each puff and pull out any strands of soft dough.  

Fill with your choice of sweet treat, ex pudding, whipped cream, fruit pie filling, etc.  You can garnish the top with a myriad of things, too, although I almost always go with frosting  :)
My family usually chooses to fill the shells with vanilla pudding (Jello makes a really yummy sugar/fat free version).  I personally always like the texture of a cook & serve vs. instant.


There are a ton of options for what you can create.  Lemon cream pairs well with a dusting of powdered sugar or a thin vanilla glaze.  
link

Peppermint flavored whipped cream would be amazing with a dark chocolate ganache.

link
Using your own imagination as your guide, you can customize a cream puff into almost anything.  Try some soon, and let me know what you did to make them your own!


xoxo,
Tami

ps... all those egg shells that you toss away every week?  Coffee grounds? 


They're the bomb for your garden.  Bell peppers especially benefit from the shells, as they're almost entirely calcium and can all but eliminate blossom drop.  Coffee grounds are great in clay like soil to lighten it up, and the residual caffeine is a growth stimulator.  Hey, recycling is cool!

Also... If you like what you're seeing and you read *still crazy* anyway, please jump on the bandwagon and become a follower!  I love knowing that there are folks out there actually reading what I'm putting out there.  :)


Linking to:


Tuesday, May 3, 2011

Sightly Sanity Savers

Sightly Sanity Savers


What a beautiful day today was!  No, not the dismal 42 degree “spring” weather, 
Booo! to the cruddy clouds, stinky sprinkles, and wicked wind.  :(
but just how the day went.  It could have been a disaster, since there is so much I need/want to get done that requires time outside (in the garden, yard, and to-do crafty pile).  Instead, some things that I have been putting off just fell into place.  First, I got a package from my beloved Smashbox.  In it was a “Try-it” kit, with travel sized versions of their best stuff, 
Great deal... and awesome stuff!
plus because of my PrettyPoints membership, I got a full sized gift of their “Tint”,


which can be used on cheeks and lips.  I got the shade called Tint, and it’s a gorgeous glowy peach.  I also got 3 other free samples... I am going to be so ready for my next trip!

Whenever I get new makeup, I get re-inspired to spend time on my appearance (duh).  I just don’t normally take the time, and it’s sad.  There’s rarely an “occasion” that requires me to look good, and D is possibly THEE least judgmental guy ever.  
I have to admit, I take that for granted.  Shame on me!
So anyway, as I’m putting on my new stuff and liking how it’s coming together, an email is being delivered to my mailbox.  You remember that I’m cheap, right?  But that I really, really like the nice stuff? And being pampered?  Well, my favorite local Aveda salon, Indira

Locations in Appleton, Green Bay, Chicago and Park Ridge, IL

has this service they call Cyberdeals.  Each morning, they look over the schedules of their stylists, and if there’s a schedulable gap, it’s put into a members-only email and sent out to entice us.  The cool part is, there’s always a nice incentive.  I’ve been watching pretty close, because I had the worst mid-40’s soccer-mom hair going on, and I don’t feel like that, so I shouldn’t have to look like that, right?  I spend a good amount of time looking through books like these, too...

I guess it's time to get the 2011 version, huh?

Yes, I could’ve cut it myself, and I have, many times, but I’ve spent too much time growing it to a reasonable length to risk messing it up.  Besides, I can’t massage my own head, neck and hands the way they do  :).  

When I read today’s deals, I was excited to see a free brow wax/shaping with a haircut, and was on the phone to book the appointment before I even checked about someone to watch Li’l T.  Long story short... I got the deal, had a wonderful experience and left looking and feeling great.  If you’re in the Appleton or Green Bay area and haven’t tried Indira yet, leave me a comment and I will send you a referral form that will get you $20 ($20!) off of your first service.  If you’re willing to take my word for it, please ask for Kristy Vargo... who dealt with my extremely thick, heavy and stick-straight hair and turned it into this...


It’s hard to get a good pic, but it’s so light and it moves so well.  Even wet, it fell right into a beautiful shape, and if it hadn't been misting this afternoon as I tried to complete my chores, it would look even better.  Honestly, this service would have been worth paying full price (and that’s almost painful for a cheapskate like me to admit!).


Next up is begging my friend Liz to spice up the color with some high and low lights. Ms. Liz works at an awesome place called B. Gee's, whose tagline is "Not Yo' Mamma's Salon".  I dunno, I'm someone's mamma, and I love them...  :)
Click here to check them out!


There's some real talent there, and they take appointments online.  If you're a more edgy type, try out Liz and her crew.  Tell Liz I sent you (she's my girl!).

* * * * * * * * * * * * * * * * * * * * * * * * * * * * * * * * * * * * * * * * * 

Besides getting some of my depleted self-esteem back, I also found this.

Not too impressive, right?  D had to pretend to be interested when I came home with it all excited.  I swear it actually called to me off of it's display at Walmart this afternoon, and I sat down and played with it right there in the store.  See, it's not just a box.  It stacks...

and stacks again.

All three layers come as a unit, and the little blue handles on the side are plenty secure to keep them all together.  I only got one today ($9.99, people!  Saaawweeeet!), but I have a feeling that one will find its way into my cart at every opportunity until some of my never-ending paper and craft clutter is contained.

So that's it, then.  Some time for myself, getting good and pampered, and the prospect of some simplified organization, and an inkling of sanity is restored.  Not much, mind you - this is the crazy house after all!

I'm counting on tomorrow being the one day this week that the forecasters know what they're talking about... they're saying 60's and sunshine.  I NEED THAT!  Hopefully there will be much progress to show off (or at least that I score big at the Thrift!).  Everyone have a Wonderful Wednesday!
xoxo,
Tami